
When I first started this blog, I didn't even own a digital camera, nor did I have a laptop. But this week, I haven't posted anything because my laptop power cord is in Nipawin and my camera is with Dave in Toronto.
But the thing is, I want to show you the awesome swap goodness I received this week (on a day when I really needed a pick me up, no less!) and show you my progress my Marie's quilt, but I have no camera. And I want to finish the sewing tutorial, but again, no camera. And to think I said, "Oh, I'll be fine without the camera for a week. Definitely take it to Toronto with you." Bah.
In quilting news, I bought a walking foot, and although I felt a bit like I was adding an artificial limb to my machine when I put it on, it is amazing. It really makes straight line quilting super fast and easy. Which is perfect when you have to practically wrap your entire body and the table next to you with quilt to manouver it through the machine. It is nice becuase it does not take away the lovely, tactile feel of just pushing fabric around and burying yourself in it (machine quilting a big quilt is the adult version of Andrew's favorite fabric game -- fabric explosion). It does make quilting a bit too simple for my tastes, though. I'm sure I'll find some way to make it more complicated and time consuming soon.
Marie's quilt will be the first big quilt I have quilted (as opposed to tied) using cotton batting, and I am loving the feel of it. It gives it a heavy weight that is just perfect, in my mind.
Hopefully, if all goes well (ha, ha, famous last words) I shall be finished the quilting by Sun afternoon, and be able to bind it on Sunday night while watching a movie. That is, if no one gets sick, there are no more giant funerals for Dave to perform, I don't get sick, I find a babysitter for Saturday, and I don't have any more sewing mishaps. The sad thing about this is that I will then give Marie her quilt on Monday, giving me only one day to admire my handiwork and pretend I get to keep it. Ah well, I can visit it anytime I want to. And I still have Bea's to finish.
One day I might even make a quilt for myself. Seriously, I'm thinking about it. I've got some fabric and everything . . .
Thursday, November 27, 2008
Saturday, November 22, 2008
Happy Birthday to me (part the second!)
No, its not my birthday again. But I did just get the present I bought myself. My in-laws give me money every year (except when they give me a sweater) to buy myself a little something. This year I got two lovely gifts for myself:

This book is fantastic! It is the sort of book that you wish you could buy every one of your friends and send it to them out of the blue. I shall do a full review of it sometime, but suffice it to say that I savoured this book, a few pages at a time, over about 3 weeks. Wonderful and inspiring stuff.

I bought a bunch of brown Mendoccino in the summer with a plan. Unfortunately I later realized that my plan was going to take about two years to complete. So I changed my plan, which required buying some lighter colours of the same fabric. This has been sitting on top of my dishwasher for two days now so I can touch it whenever I go by. It is so ridiculously soft.
Tutorial: How To Make a Simple Hand Sewn Softie, Part 1
My friend Kris doesn't sew. But she has decided to take the plunge this Christmas and make some little hand made softies for her two boys. She asked me to teach her how. If we lived "close" to each other, like we used to (25 min. drive), I would pack up the boys and drive on over. We would have tea in big mugs, the boys would play in the basement, and I would show her how to make a softie. Unfortunately she now lives in New Brunswick, and I live in Saskatchewan. That is about 6 days of 8 hr driving apart (yes, Canada really is that big). So I made this tutorial for her instead.
Any other novice sewers, either adults or children ages 8 or so and up, can also use this tutorial.
Materials you will need:

Draw an outline of your softie on paper. You will want to make it simple and round so it is easy to follow, and easy to stuff later. For your first go at making a pattern, I would draw the shape of the softie you want to end up with first. Then add about .5 cm to the entire outline so you have some space to stitch. Keep everything wide, so you will be able to stuff it later. If you can't fit a pencil into an ear or arm hole, it will be difficult to stuff.
 Cut out your pattern. Fold your fabric in half and pin the pattern and the two layers of fabric together.
 Cut out the two layers of fabric around the pattern. You might have to cut a little bit outside the outline at this point. See how some of the ears lines are not quite like the pattern? Now that you have the general outline, go in and trim those little lumps off.

Now, cut a piece of thread. If you cut too long of a piece, your thread will be getting tangled on everything. If it is too short, you will need new thread every 5 seconds. 30 - 45 cm is a nice length. Put one end of the thread through the eye of the needle. Pull about 15 cm through so you don't keep losing your thread.

Tie a knot on the end. Form a loop in the thread, then wrap the tail of the thread through the loop.

Then pull it tight so it looks like this. Do two or three of these knots right on top of each other, so you get one nice fat knot.
 Okay, time to start stitching. First, you want to make sure the knot ends up inside the softie, so you want to just put the needle through one layer of fabric. Pull it tight and gently tug it, so the knot is secure but doesn't slid through the fabric.
 It should look like this:

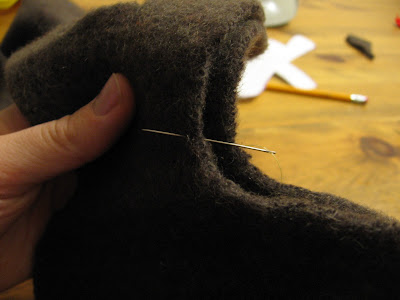
Now hold your two layers of fabric together with one hand. With the other hand, poke the needle through both layers of fabric, about .25 cm from the edge of the fabric. Let go of the needle, shift your hand to the other side of the needle, and pull it through the fabric. Congratulations, you have acieved your first stitch!

Now put the needle back in to the fabric about .25 cm from where it came out. Push it through both layers of fabric again. Pull the needle through. You now have two stitches.

The stitches should be about this far from the edge of the fabric. If you can actually see them that clearly, pull a little bit tighter, or your softie will come apart when you stuff him, or the first time little hands make him "fly".
Now you just need to keep stitching until you start to run out of thread.

When you start to run out of thread, push the needle through one layer of fabric only (the same as when we started out). Pull it through the single layer.

Make a small stitch that just catches the inside of the fabric, but not the part where you will eventually see. Do not pull this tight.

Instead, pull it until you have a nice little loop like this.
 Push your needle and thread back through the loop. I often do this backwards, because I always misjudge the amount of thread I will need to tie a knot. Kris won't have to do that, becuase she's smarter about these things than I.
 Now pull it tight, and you have achieved a knot. Cut the thread close to your knot. Cut a new length of thread and repeat the process until you have outlined almost your entire softie. When you have about 10 cm left to go, stop.
 I didn't get a chance to finish stitching my softie today, so you will all have to live in suspense until Monday or Tuesday, when I will show you how to stuff and finish your softie. Happy stitching!
Any other novice sewers, either adults or children ages 8 or so and up, can also use this tutorial.
Materials you will need:

- Some cotton thread (you can use thick craft thread with younger children, or for a primitive effect).
- A needle (if you are using craft thread, use an embroidery needle, otherwise, use one that is comfortable for you.)
- Some cotton thread (you can use craft thread with younger children)
- Sharp scissors
- Pins (sorry, Kris, I forgot this one)
- Polyfil Stuffing (you can pick up a bag at your local fabric store)
- Embroidery needle, embroidery floss and buttons for decorating
Pencil and paper
Draw an outline of your softie on paper. You will want to make it simple and round so it is easy to follow, and easy to stuff later. For your first go at making a pattern, I would draw the shape of the softie you want to end up with first. Then add about .5 cm to the entire outline so you have some space to stitch. Keep everything wide, so you will be able to stuff it later. If you can't fit a pencil into an ear or arm hole, it will be difficult to stuff.
 Cut out your pattern. Fold your fabric in half and pin the pattern and the two layers of fabric together.
 Cut out the two layers of fabric around the pattern. You might have to cut a little bit outside the outline at this point. See how some of the ears lines are not quite like the pattern? Now that you have the general outline, go in and trim those little lumps off.
Now, cut a piece of thread. If you cut too long of a piece, your thread will be getting tangled on everything. If it is too short, you will need new thread every 5 seconds. 30 - 45 cm is a nice length. Put one end of the thread through the eye of the needle. Pull about 15 cm through so you don't keep losing your thread.

Tie a knot on the end. Form a loop in the thread, then wrap the tail of the thread through the loop.

Then pull it tight so it looks like this. Do two or three of these knots right on top of each other, so you get one nice fat knot.
 Okay, time to start stitching. First, you want to make sure the knot ends up inside the softie, so you want to just put the needle through one layer of fabric. Pull it tight and gently tug it, so the knot is secure but doesn't slid through the fabric.
 It should look like this:
Now hold your two layers of fabric together with one hand. With the other hand, poke the needle through both layers of fabric, about .25 cm from the edge of the fabric. Let go of the needle, shift your hand to the other side of the needle, and pull it through the fabric. Congratulations, you have acieved your first stitch!

Now put the needle back in to the fabric about .25 cm from where it came out. Push it through both layers of fabric again. Pull the needle through. You now have two stitches.

The stitches should be about this far from the edge of the fabric. If you can actually see them that clearly, pull a little bit tighter, or your softie will come apart when you stuff him, or the first time little hands make him "fly".
Now you just need to keep stitching until you start to run out of thread.

When you start to run out of thread, push the needle through one layer of fabric only (the same as when we started out). Pull it through the single layer.

Make a small stitch that just catches the inside of the fabric, but not the part where you will eventually see. Do not pull this tight.

Instead, pull it until you have a nice little loop like this.
 Push your needle and thread back through the loop. I often do this backwards, because I always misjudge the amount of thread I will need to tie a knot. Kris won't have to do that, becuase she's smarter about these things than I.
 Now pull it tight, and you have achieved a knot. Cut the thread close to your knot. Cut a new length of thread and repeat the process until you have outlined almost your entire softie. When you have about 10 cm left to go, stop.
 I didn't get a chance to finish stitching my softie today, so you will all have to live in suspense until Monday or Tuesday, when I will show you how to stuff and finish your softie. Happy stitching!
Friday, November 21, 2008
Soup Recipe for Anna Maria Horner (and all you Americans)
Fabulous designer Anna Maria Horner is having a giveaway on her blog right now . All you have to do is give her a soup recipe and she will put you in a draw to win some of her new textiles. Well, how could I resist giving you all my favorite soup recipe?
This is my post-Thanksgiving or turkey-is-on-sale after the holidays soup recipe. I also make it with whole chickens when I'm having company arriving sometime during the afternoon or evening in the winter. I can put it in the crock pot in the morning and have a home cooked meal ready for the guests whenever they arrive, while also getting my house in some semblance of order.
It is a bit labour intensive, but I always feel virtuous when I make it because I"m getting all the goodness out of the turkey, and its delicious too.
Stock:
1 turkey carcass or small - med. whole chicken
2 onions
3 cloves garlic
5 - 6 middle stalks of celery, or tops of a whole bunch of celery
2 Tbsp salt
Water to cover
Chop all veggies coarsely. Add all ingredients to a large stock pot and bring to a boil. Simmer for 2 hrs. Or put all ingredients in a crock pot on high and leave overnight.
Get a large bowl and a colander. Pour contents of pot through colander, so stock goes in bowl and everything else goes in the colander. Let chicken or turkey cool and pull meat off. Throw out veggies and bones.
If you are not making soup right away, you can put the stock in the fridge or freezer. I often fill one ice cube tray with stock cubes while I"m at it.
Soup
Chicken or Turkey stock from above recipe (about 10 cups -- add water if you need to)
Meat from above recipe, or leftover chicken or turkey chopped into spoon-sized pieces
6 - 8 carrots, sliced
3 - 4 celery stalks, chopped
4 - 5 potatos, peeled and chopped into 1" chunks
1/2 head of broccoli, chopped into spoon-sized pieces
1/2 head of cauliflower chopped into spoon-sized pieces
1/2 c rice or elbow maccaroni
whatever else you feel like throwing in.
In pot: Chop up all vegetables and put them in a soup pot with the stock and meat. Bring to a boil and then simmer for 45 min - 1 hr. Add rice or maccaroni in the last 15 min. Taste before serving. Add salt and pepper if needed.
In crock pot: Put all ingredients except rice or macaroini in a crock pot. Let cook 4 hrs on high, or until you are ready to eat it. I usually don't add an extra grain with this one with this one. Taste before serving and add salt and pepper if needed.
Right now my 4 year old is very anti-vegetables, so I cook the celery, broccoli and cauliflower seperately, blend them up and pour them back into the soup at the end so there are no telltale green bits floating in the soup.
By the way, Anna Maria, you need to tell your Garden Party fabric to behave. I have a bunch I am saving to make myself a quilt, which I can't do until after all the Christmas crafting is done. I had all the fat quarters folded and displayed in my "Happy fabric tins"on my ironing and general mess table, and they just kept teasing me all the time. I had to put them away in my big plastic bins so I could concentrate on my present project.
Thursday, November 20, 2008
Status: Nov 20?
Burnt out. Tired. Tired physically and tired of my children and tired of tidying and washing and cooking. Tired of the rounds that are uninterrupted domestic life. Celebrating (?) the fact that I will have been either nursing our pregnant for 5 years straight next week and there is no end in sight. Wondering if all this attachment is really worth the time and effort I'm putting into it and how I'm going to maintain this level of involvement for however many years into the future its going to take for my children to reach any level of independence (seriously, at 4 1/2 can't we go to the bathroom on our own yet? Get a shirt over our head? Play independently for more than 10 min? Say "Mom!"for no apparent reason other than to interrupt my train of thought less than 100 times a day"? Wake up at 4 am ON OUR OWN. At 20 months do we really need to be nursing 8 times a day and waking up two or three times at night still?). When do they grow up? When do I get more than 20 min. to do anything without hiring someone to help me or staying up way past my bed time so I am overtired and grumpy the next day? And on top of it all, smiling and saying "I'm good, thanks", when people ask how I am because, well, what are they going to do about it if I tell them otherwise? Tell me to wean my kid and send both of them to day care. Tell me they've been there done that and they're glad its me and not them.
I know that complaining about life is breaking one of the unwritten rules of blog land, but I know I'm not the only one who feels like this from time to time.
So what do you do to get out of a funk?
I know that complaining about life is breaking one of the unwritten rules of blog land, but I know I'm not the only one who feels like this from time to time.
So what do you do to get out of a funk?
Tuesday, November 18, 2008
Quilt Giveaway
Check out this quilt giveaway . There are tons of entries, but what have you got to lose?
Wednesday, November 12, 2008
Look Who Decided to Come Calling Today . . .

Hello, Old Man Winter. Nice of you to call. Stay a while.
But this year, I hope you can start to sense when you've outstayed your welcome.
Tuesday, November 11, 2008
Lego!
My parents sent us some money for the boys for Christmas. So I ordered a bin of Lego for Andrew and a bin of Duplo for Aaron. My mom said I could give it to them as soon as it came (she hates waiting for presents).
I gave it to the boys last night. At about 4:30 this morning, after his morning snuggle (as in, he had already been awake and come into our bed to cuddle for a while), Andrew went to play with his lego. And came back in to get me to put a window in a window frame. And came back to get me to help him click on part of a car . . . and eventually convinced me to get up to build him a helicopter at 5:15 am. There is nothing quite like trying to find tiny pieces of clear lego in a bin of 400 pieces when your eyes haven't quite focused yet!
Of course, Aaron thinks his Duplo is okay, but he really wants to play with Andrew's Lego. I'm still getting the hang of this younger sibling thing, obviously.
Pop Garden Picnic Quilt
Remember this picnic quilt ?
Well, my friend Lydia really liked it when we used it at Andrew's birthday. So when she was looking for a gift for someone who has everything, she asked me to make one for her to give. So, I did:

I found it really hard to make a quilt for money. I charged her what I thought was a fair price, but it still felt really expensive to me, so I felt like it had to be super perfect. Because I was so nervous, I kept making silly mistakes. First I had half pop garden fabrics and half other fabrics, but the browns I was using were to different from these, and I wasn't sure if anyone but me would like it. Then I decided to put some blocks with half white and half blue corduroy, but those looked goofy (Dave asked, "Is there supposed to be something underneath them?"). Then when I stitched the whole thing together I missed a corner . . . Basically, this quilt was deconstructed and reconstructed as many times as Hamlet.
So ironically, I had originally figured I would charge a price that would pay me about $18 / hr. But I ended up making about $10 / hr because I kept goofing up. Next time I just have to be more confident in my decisions and less stingy with my stash. If there is a next time. I still don't have a quilt to snuggle under on my couch without stealing one off Andrew's bed. And that was pretty stressful.
Anyway, the backing is amazing. Its some brown duck fabric I got at Tonic Living . Its Canadian, so I knew they would be able to ship the fabric to me fast. It is organic and naturally dyed and gives the quilt a nice weight. I put rock pockets on it, but I don't think it really needs them. It weighs several pounds.

I am pretty happy with the final result, and I hope my friend is too. We shall see.
Saturday, November 08, 2008
Kitchen Poetry 6
Little boys are like animals in many ways. One similarity I love is the tendency to leave trails behind. If its one of those days where you don't get to tidy until 9 or 10 pm, you can see the tracks of your child's activities throughout the day. Here's a few from today:


It is fun to follow along with all the Kitchen Poetry images. I love all the dialogues going on photographically about fridges, baking, dishwashers, children, glassware, sinks, messes and tidying up. It is amazing how many variations there are on the theme of ordinary life. It really is magical to find so much beauty and joy in the everyday.


It is fun to follow along with all the Kitchen Poetry images. I love all the dialogues going on photographically about fridges, baking, dishwashers, children, glassware, sinks, messes and tidying up. It is amazing how many variations there are on the theme of ordinary life. It really is magical to find so much beauty and joy in the everyday.
Chocolate coffee icing
I did it! I figured out how to make good, dairy free chocolate icing! Icing without butter is a sad and often slightly chemichally tasting thing, so I am always trying to find ways to make it good. I think I finally found one! This was a moment of brilliant kitchen inprovisation today, I tell you. Unfortunately this means it is a very vague recipe. This drives my husband crazy. I make something perfect and he says, "That was great. You should make that again. . . . Do you remember how you made it?" and I say, "I think so, I just kind of made it out of my head.". Then he sighs, knowing he'd better enjoy it this time around becuase it will never be as good a second or third time.
So, chocolate coffee icing (measurements are approximate):
1/3 c margerine
3 Tbsp coaco
about 2 c icing sugar (I am sad to say I just dumped it in the bowl until it looked right)
1 - 2 Tbsp coffee (until a nice consistency)
Put margerine, coaco and icing sugar in a bowl. Blend with electric beaters until it starts congealing. Add coffee until smooth. Hooray for leftover coffee sitting next to my staples cupboard!


Thursday, November 06, 2008
Kitchen Poetry 4: Stealth Broccoli
Andrew, my oldest, is in that "Oh, I hate (fill in the blank healthy food that he just gobbled down yesterday here). I won't eat that." One of his new favorite foods to hate is broccoli. Unfortunately for him it is nutritious, and reasonably priced at this time of year. And I can't abide chicken soup without broccoli. So I have been trying to sneak the broccoli in for the last few weeks when I make soup. Today, I cooked the broccoli, cauliflower and celery seperate, then blended them up with the hand blender.

Mission accomplished: "Oh, I don't want the potatoes, mom. Just the froth". Heh heh heh.

Now if only we could convince Aaron that salad dressing and soup don't mix.
This was our bread today. Really tasty -- one cup of multigrain flour and one cup of white to lighten it a wee bit. I tried to convince Aaron to punch the dough, but he just wanted to eat it.

He also snuck some large chunks out of the side of the loaf while it was cooling. He is such a monkey boy.

Mission accomplished: "Oh, I don't want the potatoes, mom. Just the froth". Heh heh heh.

Now if only we could convince Aaron that salad dressing and soup don't mix.

This was our bread today. Really tasty -- one cup of multigrain flour and one cup of white to lighten it a wee bit. I tried to convince Aaron to punch the dough, but he just wanted to eat it.

He also snuck some large chunks out of the side of the loaf while it was cooling. He is such a monkey boy.
Wednesday, November 05, 2008


Works For Me Wednesday -- Good Toy Edition
This is my list of toys that we love to play with, for Works for Me Wednesday over at Rocks In My Dryer -- a helpful mom blog . She is compiling lists of toys kids actually enjoy, so we can all be smart this Christmas.
I have two boys, four and almost two. These are the things they play with almost every day:
Dress up clothes: For my older son's 3rd birthday, I went to Value Village and bought a bunch of hats, jackets and scarves. I added some construction hats and firemen hats and presto: the best toy ever. It is rare to see my children without a strange hat, shoes or coat on.
Imaginext Castle Set: I don't think this is on the market any more, but you can get it on ebay now and then. Even though it is really a litte on the old side for them, we set it up every day.
Playdoh: We make our own and have added rolling pins, cookie cutters and Matchbox construction vehicles to it. We spend about an hour a day in winter playing with this.
Playmobil Junior: We have some of the vehicles and people from the Playmobil 1 1/2 - 3 line and they go everywhere with us. We have the race car, the motorcycle and the boat. I got a little dump truck with matching garage, but the back of the truck comes off too easily, as does the door of the garage, so it doesn't get played with.
Play tools: we have several sets of pretend tools, both wood and plastic. These work best if they come with a tool box or belt so they can be dragged around the house. My sons love these, but I found that the little peg benches to bang on are never used - my sons prefer to bang on wood blocks or the furniture. You do need to set limits on what they can hammer on, however. Also, be careful of hammers with painted ends -- they will mark your walls and furniture.
Tuesday, November 04, 2008
Kitchen Poetry 2: Mischevous Munchkins Edition
Mostly what happens in my kitchen these days is a lot of two-year-old mischief:


Fortunately, at the end of the day we did all sit for a few moments and have tea. So long as our cups got to look as much like Mom's as possible.


Fortunately, at the end of the day we did all sit for a few moments and have tea. So long as our cups got to look as much like Mom's as possible.


Kitchen Poetry 1


I was over at happythings and she is doing a photo challenge for the week from simple sparrow to take photos of life in the kitchen for the week. I'm starting a day late, but thought it would be fun to join. As it ends up, it was busy in our kitchen yesterday.
Subscribe to:
Posts (Atom)

