
We are going on a vacation this week. It means we have a bit of a crazy journey today. First we have to drive to Saskatoon, then just at supper time, we have to fly to Edmonton, switch planes and fly to Toronto. We arrive just around midnight. Happy New Years to us.
We are staying at my brother in law's house. I don't think they have internet connection, or if they do the definitely don't have wireless, so things might be a bit spotty for the next few weeks. We'll see how often I can get out to Starbucks or the library.
Have a safe and happy New Years, and a great two weeks. Catch up with you all in the middle of January if I don't get much internet time.
Wednesday, December 31, 2008
Monday, December 29, 2008
New Literary Sensation
Have you heard yet? There's a fresh literary voice out there. A voice full of adveture, danger, and robots. And his first masterpiece, a harbinger of things to come?

Yes, that is right. English Pam, Published by Andrew. The gripping tale of good guys and bad guys and a city on fire. Add in robots, the Dead Sea (?) and you have a tale of drama and pathos.
This all started when Andrew was telling me the story about his fingerpainting, that apparently involved a superhero and a bad woman who turned into a squid. He wanted to write that story down, so we did. And then he decided he had to draw more pictures for me to write down the stories. After the pictures were drawn and the story copied out, but he then decided it needed a cover and that it needed to be stapled together.
Here's the story descriptions of the pictures:
"Page One: Up here, the bad guys attack. Down here is the city of the good guys.
Page Two: This is a fire (see photo). The whole bad guy city broke their own city. The bad guy city was burnt down by the good guys. Some old buildings fell down, but no one was there, so it was okay.
Page Three (the dramatic conclusion): Very terrible stuff, like lots of earthquakes and the bad guys were roasted alive. Some of the bad guys were hurt, and even killed.
Then this huge accident happened. It happened in the bad guy town and one guy shot a gun and the whole town was burned. Then the Dead Sea was behind the city, and it came and took over the city and the bones were left.
Then a bunch of water flooded and destroyed the city. Then it was dug and they found all kinds of stuff -- robots and superhero bones. It was all under the Dead SEa which was dry, and full of rubble and stones.
Some of the good guys friends were in the city of the bad guys. They died and their bodes were buried in a graveyard and some elephants go jungle fever. They died too.
Then all the good guys flew over and there was a bad explosion. But non of the good guys or their friends really died because this is pretend world."
Governer General's award, here we come.

Yes, that is right. English Pam, Published by Andrew. The gripping tale of good guys and bad guys and a city on fire. Add in robots, the Dead Sea (?) and you have a tale of drama and pathos.
This all started when Andrew was telling me the story about his fingerpainting, that apparently involved a superhero and a bad woman who turned into a squid. He wanted to write that story down, so we did. And then he decided he had to draw more pictures for me to write down the stories. After the pictures were drawn and the story copied out, but he then decided it needed a cover and that it needed to be stapled together.
Here's the story descriptions of the pictures:
"Page One: Up here, the bad guys attack. Down here is the city of the good guys.
Page Two: This is a fire (see photo).
 The whole bad guy city broke their own city. The bad guy city was burnt down by the good guys. Some old buildings fell down, but no one was there, so it was okay.
Page Three (the dramatic conclusion): Very terrible stuff, like lots of earthquakes and the bad guys were roasted alive. Some of the bad guys were hurt, and even killed.
Then this huge accident happened. It happened in the bad guy town and one guy shot a gun and the whole town was burned. Then the Dead Sea was behind the city, and it came and took over the city and the bones were left.
Then a bunch of water flooded and destroyed the city. Then it was dug and they found all kinds of stuff -- robots and superhero bones. It was all under the Dead SEa which was dry, and full of rubble and stones.
Some of the good guys friends were in the city of the bad guys. They died and their bodes were buried in a graveyard and some elephants go jungle fever. They died too.
Then all the good guys flew over and there was a bad explosion. But non of the good guys or their friends really died because this is pretend world."
Governer General's award, here we come.
Sunday, December 28, 2008

 These are my new melamite serving bowls. Did you know I've been married for 15 years next week and I've never had more than two serving bowls at a time? They have this bad tendency to get broken, so I decided that despite my innate love of funky pottery, these would solve my present love of things that Aaron can't smash to pieces.


What I've Been Making Lately
Well, part of the reason my blogging has been so scattered lately is because I have been stitching like mad. I am still working on gifts to bring with me on holidays next Wed, but I do have the boys Christmas gifts finished. They were also stalled due to a request that I make another picnic quilt for another friend. She asked for it the first week of Dec. and needed it done by Dec. 20. Since she requested blues and browns, and I didn't really have anything in my stash that would work, I had to wait for the fabric to come in the mail before I could start. This put all my other Christmas crafting on hold.
I couldn't get a good photo of the colour, since this was during that cold, grey spell, but here it is. This one doesn't have the rock pockets, since they were not my intellectual property. But I think with the organic duck fabric on the back it is heavy enough without them.

They wanted to be able to roll it up, so I added these two straps to the side that velcro it up like a sleeping bag, and make it about the size of a thick rolled up yoga mat.
 This is the finished space ship. Ironically, after I spent hours of extra time stitching in dowels so that it would stand up like this, it is mostly held on its side and flown around, or laid on the floor.
 And these were the other two last minute gifts I stitched up when I realized I wasn't going to have time to make the car floor mat I had been planning. The capes are Kona cottons, with simple zig-zag edges and a neckband with a velcro closure. The sword belts are leftover canvas from the picnic quilt, with velcro closures and a loop for the swords I bought (that were actually "from" Grandma and Grandpa). I liked them. Andrew weard the sword belt, but isnt too interested in the cape. Aaron, who will wear nothing but loose pyjamas these days, finds them too constraining.
Happy Christmas
Christmas morning is a little odd at our house. You see, we don't do Santa Clause, and Dave's family has always had a very informal Christmas. And Dave is always exhausted by Christmas day, due to having to attend and preach at and MC assorted Christmas events, including the Christmas Eve service. So our tradition is for me and the boys to wake up and make pancakes. This year is was banana blueberry buckwheat (try saying that five times fast).

After we eat our creations, we finish wrapping presents, and the wake up Dad.
 Dave and I just got each other stockings this year, since he prefers to buy his own presents (he's quite particular), and he hates to waste money on things I may not like. We did have some cool presents for the boys, however. Among them the complete rocket ship for Spaceboy:

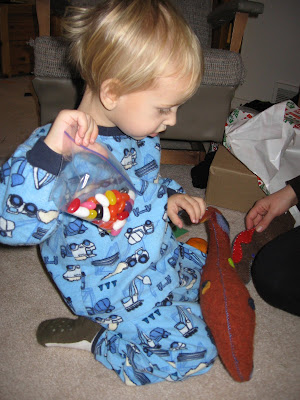
A dinosaur for Aaron -- though is favorite present of the morning was the jellybeans in his stocking.
 Plus swords, sword belts and capes, and action figures that Andrew actually bought for himself and Aaron. The action figures have kind of upstaged everything except the rocket ship, and so the swords haven't seen much use yet. I know they're time will come, so I'm not too worried.
This was followed by Dad going back to sleep, the boys playing with their presents, and me making dinner. We felt really blessed this year because one of the youth group kids gave us a turkey for Christmas, and someone in our church gave us potatos and squash, so virtually our whole dinner was provided for us. Since Dave doesn't eat rolls, and no one else eats stuffing, we just added some carrots for the boys, who don't like squash, and my famous apple pie. Yum.

We had quite a quiet Christmas this year -- the boys stayed in their pj's all day, and we had several nice phone calls from family living across the country. When my family gets together for Christmas it is always a rowdy, loud, dramatic affair, so I do miss the noise and craziness. But it was nice to know that I am building Christmas traditions for our family that will last for years to come, and to give the boys nice memories for the future.
How was your Christmas? Do you have a favorite moment?

After we eat our creations, we finish wrapping presents, and the wake up Dad.
 Dave and I just got each other stockings this year, since he prefers to buy his own presents (he's quite particular), and he hates to waste money on things I may not like. We did have some cool presents for the boys, however. Among them the complete rocket ship for Spaceboy:
A dinosaur for Aaron -- though is favorite present of the morning was the jellybeans in his stocking.
 Plus swords, sword belts and capes, and action figures that Andrew actually bought for himself and Aaron. The action figures have kind of upstaged everything except the rocket ship, and so the swords haven't seen much use yet. I know they're time will come, so I'm not too worried.
This was followed by Dad going back to sleep, the boys playing with their presents, and me making dinner. We felt really blessed this year because one of the youth group kids gave us a turkey for Christmas, and someone in our church gave us potatos and squash, so virtually our whole dinner was provided for us. Since Dave doesn't eat rolls, and no one else eats stuffing, we just added some carrots for the boys, who don't like squash, and my famous apple pie. Yum.

We had quite a quiet Christmas this year -- the boys stayed in their pj's all day, and we had several nice phone calls from family living across the country. When my family gets together for Christmas it is always a rowdy, loud, dramatic affair, so I do miss the noise and craziness. But it was nice to know that I am building Christmas traditions for our family that will last for years to come, and to give the boys nice memories for the future.
How was your Christmas? Do you have a favorite moment?
Wednesday, December 24, 2008
Merry Christmas!
Hope you all have a fantastic Christmas!
As our seasons turn, and the darkness recedes, may you remember and celebrate The Light, as he broke into history to fill us with light, joy and peace.
Have a relaxing season. Enjoy your family and friends. May all of you, especially my fellow clergy families, get some down time during the Christmas season.
Um, yeah, and my Christmas cards? Epiphany cards again. Sigh.
Hibernating
We are going on our second week of uncovered-skin-will-freeze-in-X-minutes weather around here. While many places in blogland (at least the little corner I read) are enjoying unexpected dumps of snow, we are enjoying temperatures around -35C with the windchill. We haven't been outside, except to run from the car to the house, in two weeks.
Living this far north also means that the change of seasons is very dramatic. At present we are getting about 7 hrs of sunlight a day. My body has reset itself to hibernate mode. It wants to fall asleep with the boys around 7 (when it has already been dark for two or three hours), wake up around 11 and go back to sleep around 1 or 2am. I find this really interesting, since my usual most-awake time is between 11pm and 2 am, but it kills me to stay up that late when I have to wake up at 5 or 6 . .. or 3:30.
Here's a peek into a few of the things we've been doing to try to keep the boys busy (the playdoh photo is taken by full spectrum lighting - we got a little light that is supposed to help with SAD. We shall see.):


Thursday, December 18, 2008
Great Giveaway on Simple mom!
Check out this great giveaway on Simple Mom . I've been coveting some Twist Ties for a long time, and the other stuff all looks fabulous. Definitely worth entering.
Wednesday, December 17, 2008
Hey, I'm on CBC radio!
CBC's show Spark was looking for cool uses of technology the other week, so I posted a comment on their blog about how I thought it was cool that small designers were offering sewing patterns in PDF format.
Well, it ended up that they were in the midst of doing a documentary on sewing and the web. They contacted me and got me to repeat my comment over the phone, and apparently it made it into this week's show!
I haven't heard it yet because I was in the midst of dealing with a meltdown during it, but it aired today, and they're playing the episode again on Saturday. Or you can listen to the podcast here:
http://www.cbc.ca/spark/blog/2008/12/episode_58.html
The reporter thought I was talking about Spoonflower and designing your own fabric patterns, rather than ordering sewing patterns from designers, so my comment may actually be out of context, I'm not sure. We shall see.
Work in Progress . . .
I finished one coaster. I was making this set of scrappy coasters for my Sister-In-Law, but I love them so much, I think I'm going to keep them and make her some single fabric ones. She will probably like the plain ones better, but I love the bright, funky colours in these ones. And these really are quick and addictive.

Here's my progress so far on the rocket ship:


Now I just have to figure out how to stop it from tipping over. I bought some little dowels. I just need to stitch them inbetween the layers.

Here's my progress so far on the rocket ship:


Now I just have to figure out how to stop it from tipping over. I bought some little dowels. I just need to stitch them inbetween the layers.
Christmas At Our House
'Tis the season for Christmas decor show and tell, apparently. We don't have very much in the way of Christmas decoration . . . um, actually let me put it another way. We don't have much in the way of tasteful Christmas decor that I actually like. We have been given ceramic battery operated houses, folk art Santa dolls, and many other strange Christmas items since we have moved to Saskatchewan. And until I bought about 10 new mugs this fall, about half of our remaining mugs (mugs don't last long around here, I'm afraid) were Christmas mugs. But as far as put-it-out-at-Christmas stuff, we're a bit lean around here.
Add to this the lack of furniture in our house (have I not told you about our years of obsessively cheap / simple living that included keeping our clothes in banana boxes and sleeping on a flip out love seat bed thing?), and you get just a little bit of Christmas cheer scattered here and there. As usual, I had great plans, including a flock of green and red birds, but none of them came to fruition. None the less, let the Christmas display begin:
 This is our kid-friendly nativity table. It is a storage chest (courtesy of Anna I.) that we keep in our hallway. The two little Christmas trees we were given by an older couple in our church. The wooden nativity people were made in Sunday School. They were ridiculously difficult to make, because the fabric was ironed onto the wood, but first had to be ironed and maticulously cut out. They are fun to play with, but if I were to make a set myself I would have just painted them.
 This is my little display on my shelves above the table. Two angels, some Christmas cards and (not pictured) the one little bird I did manage to make. I love these two angels, but with a rambunctious two year old and a four year old that loves to "fly"his animals, I don't want to put them on the tree. One day, when I live in a non-beige house, they will look even better.
 Our tree is also very simple this year, due to the boys. I have a set of really lovely clay ornaments given to my by my friend Kris, and a set of little cross stitch spools my sister made me, but they did not make it on this year, since I lost some of each last year. We just have corn-silk angels and these felt ornaments. There are hearts and stars. I made them in university when Dave and I first got a tree. I have really clear memories of carrying them around in my big red backpack and pulling them out to stitch between classes and while visiting friends. And yes, I was the only 20 year old drama student stitching handmade Christmas ornaments in the green room during The Crucible.

Here is our tree in all its prettiness. Our "tree skirt" is an old cotton thermal blanket. Its from back in the day when Forest Green was THE colour.
So hope you enjoyed a little view into my scantily decorated house. Hope you're feeling the Christmas vibe wherever you are.
Add to this the lack of furniture in our house (have I not told you about our years of obsessively cheap / simple living that included keeping our clothes in banana boxes and sleeping on a flip out love seat bed thing?), and you get just a little bit of Christmas cheer scattered here and there. As usual, I had great plans, including a flock of green and red birds, but none of them came to fruition. None the less, let the Christmas display begin:
 This is our kid-friendly nativity table. It is a storage chest (courtesy of Anna I.) that we keep in our hallway. The two little Christmas trees we were given by an older couple in our church. The wooden nativity people were made in Sunday School. They were ridiculously difficult to make, because the fabric was ironed onto the wood, but first had to be ironed and maticulously cut out. They are fun to play with, but if I were to make a set myself I would have just painted them.
 This is my little display on my shelves above the table. Two angels, some Christmas cards and (not pictured) the one little bird I did manage to make. I love these two angels, but with a rambunctious two year old and a four year old that loves to "fly"his animals, I don't want to put them on the tree. One day, when I live in a non-beige house, they will look even better.
 Our tree is also very simple this year, due to the boys. I have a set of really lovely clay ornaments given to my by my friend Kris, and a set of little cross stitch spools my sister made me, but they did not make it on this year, since I lost some of each last year. We just have corn-silk angels and these felt ornaments. There are hearts and stars. I made them in university when Dave and I first got a tree. I have really clear memories of carrying them around in my big red backpack and pulling them out to stitch between classes and while visiting friends. And yes, I was the only 20 year old drama student stitching handmade Christmas ornaments in the green room during The Crucible.
Here is our tree in all its prettiness. Our "tree skirt" is an old cotton thermal blanket. Its from back in the day when Forest Green was THE colour.
So hope you enjoyed a little view into my scantily decorated house. Hope you're feeling the Christmas vibe wherever you are.
Saturday, December 13, 2008
Fabric and Chocolate swap - Nov.
This was my amazing swap package from miaki in London, England. This fabric is so great -- I love cordoroy, and I love these colours. The chocolate was really rich, and the buttons will work perfectly in my playmat scheme.
But the best part is the little pincushion. Do you see the photo of it? Well, it is about 4 x 4 inches. The house is about an inch and a half high. Do you see all the little details on this thing? It is truly amazing.

But the best part is the little pincushion. Do you see the photo of it? Well, it is about 4 x 4 inches. The house is about an inch and a half high. Do you see all the little details on this thing? It is truly amazing.
Man, Am I Behind!
So, it appears I am behind on a few updates! First, let me show you my first Japanese craft book and fabric:

The cups are going to be the inside of a tea cozy I am scheming to make, and I think I might use the rest to make a little table runner to match, or a wall quilt. The fat quarter of Christmas fabric was something she threw in, and the book is full of lovely tops and dresses. Very cute. I got it on etsy at a little goodness.
This is the cute little quilt I got in November for the mini quilt swap. I have been a bad swap partner and have yet to send my quilt. But this is a cute little octopus I received. I think it will be great in Andrew's room.

And this is Andrew's quilt from the kid made quilt swap. Isn't it great? It has tons of fantastic fabrics in it -- frogs, fish, bees, and lots of bright colours. The back is this this great dinosaur fabric, and Andrew's name, and the name of his swap partner, are quilted into it.

The boys both love it. When Andrew was really sick, he snuggled with this quilt. Every morning, when we watch tv, the boys love to have over both their legs to keep them warm. Its a great little quilt. Thanks so much!

Thursday, December 11, 2008
Psst -- look down
and to the left. I finally decided to put up a list of the blogs I read. I wish I could give you a personal review of each and every one, but I don't think I have time. But if you're looking for some new blogs to read, there are some great ones there. About half to two thirds are quilters, some are personal friends, and some are people I think are wise, or interesting, or just fun to read.
The reason its taken me so long to put up a blog list is because I felt kind of strange showing you all what I read. I don't know why, because its courtesy in the blog world to link to people you like. But I've never been big on courtesy, have I? I guess I'm just learning that in the real world, all those little social niceties actually matter. So I should follow them in the blog world too.
The reason its taken me so long to put up a blog list is because I felt kind of strange showing you all what I read. I don't know why, because its courtesy in the blog world to link to people you like. But I've never been big on courtesy, have I? I guess I'm just learning that in the real world, all those little social niceties actually matter. So I should follow them in the blog world too.
Monday, December 08, 2008
Longing to Wear a Dress
So, this is the thing. As of next week, I have been officially pregnant or nursing for 5 years. That is right. Five long years of not having my body to myself. I know this is supposed to put me in blissful mama land, and that many women LOVE being pregnant and LOVE nursing and are sad when its over. But I am not. I love having my body to myself and having it be a fairly predictable size, so that I can buy decent quality clothes that look good now and will still look good three months from now.
Instead, I have this hodge podge wardrobe that doesn't co-ordinate very well that spans over four sizes. Every time I think "Yeah, I can finally wear THIS" . . . I then grow into / out of something else I love. It is very dis-heartening when you love clothes the way I do.
Anyway, back to the dress thing. I also love dresses. I love to wear knee length dresses with tights and sweaters in the winter (and dream that someday I may even get an awesome pair of boots to complete the look) and long dresses with sandals and a light cardigan in the summer. I love the whole dress as a layer under jeans thing that is back in style right now. Although my wardrobe is not otherwise very girly, I do love a cute dress.
BUT, they are impossible to nurse in. And when you have embraced long term nursing on demand, that is a problem. You can't just whip up a dress and feed your baby in the grocery store. It just doesn't fly so well.
Lately I have been spending too much time (that should be spent doing housework or making Christmas presents, or hey, sending out those Christmas cards) cruising around on etsy. And let me tell you, there are a lot of cute dresses on etsy. Just my style of cute dresses -- little loose jersey and linen above the knee dresses. Check out this sweet dress or or this amazing one . So cute. So totally the Jillish clothes I have never been able to find anywhere. I just love them. And I can't buy them or wear them because I"m still nursing.
Sigh. The things a girl sacrifices for her children.
Saturday, December 06, 2008
Not So Handmade Holidays After All
I love making things for people. Not just any things. I love to be able to come up with something cool, that is an original design, and that somehow reflects who that person is, and/or reflects an understanding of something they could really use at the moment. I just love to bless people with wonderful, quirky handmade things. I consider it to be part of my gift of encouragement.
But there is a problem. I am a perfectionist, in my own small way. Not that I like to have things done perfectly (many of you can vouch for this, I am sure -- especially those of you who have had me visit with needle and thread in hand to mend my handmade gifts), but that I like things to be perfectly suited to their intended receiver, and to be perfectly original and interesting and cool. And I like the recipient to know (although I have come to realize that non-sewing people don't actually know the difference) that I have done more than just pump out a million similar items from a simple pattern and pass a few off to them. No, instead I have slaved away making the MORE COMPLICATED version of fill-in-the-item-here handmade gift. The quilted, hand bound baby blanket, not the flipped inside out, tied one. The two fabric bean bags with novelty fabric on one side and different legumes in each bag so the child can explore a variety of weights and textures, accompanied by a handmade matching bag. Okay, so maybe I'm not so much a perfectionist as I am really vain. And easily bored by making the same thing more than once or twice.
In any case, whatever the reason, I always find myself scrambling to finish the gifts I have decided are the ONLY possible ones I can make. I give my own children robots without eyes in their stockings ("I promise that when you wake up tomorrow morning, your robot will have a face, honey.") because I have decided that I need to make three kinds of fudge for all the choir members at our church and a hand made present for the youth group under-five-dollars gifts exchange. I don't get my Christmas cards sent until January because I decided to make a dozen hand stitched felt ornaments for my sister who is hosting me for a week. I could give you an example from almost every year since I stopped making Christmas crafts as part of the school curriculum.
This year is no exception. Just today I was starting to wonder how I was going to get all the bird ornaments I had decided to stitch up for Andrew's preschool teacher and assorted people around town done in time for Christmas, plus get the two cool, elaborate gifts I have planned for the boys completed in time. And I was thinking about this while I finished off the hand stitched dinosaur I need to send off to Sam for his birthday that was two weeks ago. I was getting grumpy with my kids because they wanted me to read them books while I was trying to sort through fabric combinations for assorted elaborate presents. I was getting grumpy with my husband for the fact that he has had so many funerals and greiving and dying people to visit in the past month and a half. that I can't get two hours to stitch birds together in the basement. And I was getting frustrated with my twenty three month old for the fact that his molars are taking so long to come in and that he decided to enter the "no"stage now, while I'm trying to figure out which pieces of felt to make his Tyranasaurus Rex out of and which to save for Andrew's fantastic felt rocket ship I'm inventing out of my head.
And I thought, you know, I stay at home so I can read to my children, and be the one to discipline and love them through their highs and lows. I decided to be a non-working minster's wife at this point so I could support my husband in his very busy, draining job. I do crafts on the side, for fun and occasional profit, not to add an extra stress to my life.
This made me realize that this is not really a year for hand made gifts for teachers and postmen. This is not a year for making overly complex gifts for people who don't sew and will be just appreciate getting a hand made present. This is definitely not the year for making complex gifts for people who will not want / need / appreciate them, thus burning myself out only to then be disappointed that my gift did not meet with the approval I had hoped it would. This is not a year for pleasing or impressing. This is a year to enjoying making a few lovely, well crafted presents for my boys and a few of our family members and friends. And for giving everyone else a sleeve of three nice chocolates or a bag of home-made gingersnaps. Because seriously, most people would rather add a few extra calories to their waistline than an odd object from Jill to their junk closet.
And of course, those who I know love my handmade silliness will continue to benefit from my craftiness. Just maybe not after I get my Christmas cards done.
Thursday, December 04, 2008
Advent Calendars
I have a dream. A dream of an advent calendar. It is made entirely of wool felt. It has pockets with numbers on, and in each pocket there is a little felt figure or symbol that represents advent, along with a verse that relates to the symbol. Also, of course, there are little candies for each day. The figure gets velcroed or buttoned to the pocket to count down to Christmas.
One day, I will make this calendar. Until then, this is what we've made for the last two years:

As usual this was a collaborative project. MY idea was that they boys would colour them and put one construction paper star this week, to represent the coming King. But then once we had that glued on, Andrew said, "I need a heart, Mom. To show that I love Aaron."
Well, how could I say no? Before long there were three hearts, one for Aaron, one for Dad and one for Me. And then he wanted to cut out his own shapes, to represent his friends . . . and by then it was totally Andrew's project and I had no say in it. That's kind of how things go around here. Andrew is going to have trouble with close-ended assignments at school, I'm afraid. He seems to have inherited my bad habit of not being able to think inside the box.
Anyway, these were a lot of fun to make. They provide a lot of gummi bear related excitement every morning, and brighten up our kitchen a bit. And, most importantly, they help keep Advent in mind, and make the count down to Christmas a bit more understandable to little minds and hands.
Tuesday, December 02, 2008
Finally done!
Here is quilt one, all folded up and ready to go to Nipawin to my god daughter.

When I first laid out all the squares for this quilt, I just randomly pulled 20 squares out of the 40 squares I had made, and I had a bit of a panic. It looked just WAY too busy and crazy. It didn't seem to blend well at all. You could hardly even see the stars.
So then I laid out the other 20 stars, and realized that all the stars with cream and light polka dots and cream were in the second pile, while most of the ones in the first pile had the little firecracker patterns or cherry patterns, which were REALLY busy.
I was doing this at youth group while the kids were out doing a bigger and better hunt, and one of my older students (he's in second year university) stopped by to say hi. I recruited him to help me figure out how to fix my two quilts. Twenty minutes later, after much turning and switching and switching back of blocks while discussing why he was more suited for a different program than the one he was studying in, and we had a layout.
We decided this quilt had a "red" vibe, while the other kept a more mellow "blue" vibe. I was happy because that had been my plan from the time I accidentally miscut the red daisies many months ago and had to substitute a bunch of blue to make up the difference . . .

So then I got to work, as described in this post and quilted this beauty in two days. I am super happy with how well the Heather Bailey fabric on the back co-ordinates with the American Jane stuff on the front, and how the tone on tone orange makes a perfectly luminous border.

I was a little sad that I pulled it out of the wash on Monday afternoon and gave it to my god daughter monday night. No showing it off to anyone (well, except online). But I think it was better that way. If I had had it laying around my house for more than a few hours, I don't think I would have been able to give it up.
This quilt is definitely my best work yet. With Jeremy's quilt , I felt like I finally got my patchwork and quilting techniques up to a level I was happy with. With Marie's quilt, I feel like I'm also starting to get to the quality of composition and colour mixing that I am happy with. I feel like I'm getting into a quilting groove. As much as I love all those Modern, stark quilts made with solids, it appears I am a busy patchwork quilt kind of girl. Ah well, Glorious Patchwork, here I come.
Tutorial: How To Make a Simple Hand Sewn Softie, Part 2
Welcome to the second part of my tutorial. Part one of the hand stitching tutorial is here . When I was stitching, I realized that I don't usually use polyester thread. I thought it would be good because it is stronger. In practice, I found it to be really slippery and annoying. I'm going to go back and change part one, but if you've already started, and you're having trouble with the thread slipping out of the eye of the needle, its not you, its the thread. Hie thee to your stash or a fabric store and pick up cotton thread. My appologies.
I should preface this section of the tutorial with a disclaimer: no happy bunnies were harmed in the making of this tutorial. Felt creatures enjoy having faces sewn on, no matter how gruesome the photographs might make it seem.
So, at this point you should have stitched all the way around your softie, leaving a hole that is a couple of inches big for stuffing.
 Take a handful of polyfil out of the bag:

Squish it a few times until it gets smaller, like this, and then stuff it into the hole. Stuff the extremities first: legs, ears, tails, that kind of thing. You want to stuff it firmly enough so that it is 3 dimensional, but not so firmly that it looks like it is about to burst.
 If you are finding you can not pack the stuffing in as much as you would like with your hand, use the flat end of a pen or the eraser end of a pencil. I did this for the ears:
 See, I stuffed the legs and the ears first, since they are almost impossible to get to once you start stuffing the middle. If you find you have a section where you stitched too loosely, so that even a tiny bit of stuffing is pushing the two sides apart, go back and re-stitch it with a new piece of thread.
 Once you have done the legs and ears, stuff the arms, and then the middle. You will find that the fabric stretches. This is okay, so long as it doesn't thin out so much that you start to see the stuffing through the fabric. You can see that my bunny is now taller than he was before. When it is nicely full but not overstuffed, stitch up the hole. Start about a cm. away from the beginning of the gap, and stitch 1cm over the other seam on the other side.
 You should now have a softie that looks something like this guy below. It is now time to embellish! You may do whatever you like to him. Below I will show you how to do basic embroidery (a back stitch), put on buttons, and add contrasting felt decorations. You should know that I have sort of learned all these things on my own over time, so my techniques are not professional. They do, however, get the job done.
 Thread your embroidery needle with your embroidery floss. If you want a thinner piece of thread, you can divide your floss. Cut the length you want, and then pull apart the number of strands you would like to use for the project. Because I am lazy, I usually use all 6. You might have to lick the end of the floss and flatten it with your finger to help manouver it through the needle. You could use a little bit of lip balm on the end if you are averse to giving away a creature that contains your saliva. After your needle is threaded, tie one knot of the end.
 Decide where you want to place your first button eye.

Poke your needle into and out of the fabric. Hold the button nearby, so you can make sure that your stitch will be hidden under the button.

Pull the thread through. Try to pop the knot to the inside of the fabric by tugging gently. If it doesn't work, clip the thread close to the knot (but don't cut into the knot or it will unravel). Put your needle through the hold in the button, and pull the thread through.
 Lie the button flat against your guy's face. Poke the needle through a button hole opposite to the one you just used and into the fabric below it.
 Then push the needle kind of flat and poke it back out of the fabric. Make sure all of the stitch will be covered by the button, then pull it tight. Now push the needle through the button hole you started at and pull tight. Repeat two or three times for each set of holes. This takes a bit of needle wrangling, but its the best way I know to secure a button.
 Now, poke the needle through any hole. If you want the buttons to be a bit more secured (and your mass of threads to look a bit tidier) wrap the thread around all your previous stitches once or twice. Then tie a knot the same as you did when you were ending a thread while stitching along the sides. Make sure the knot will be covered by the button as well, and clip your thread very short.
 Congratulations! You just sewed a button on. Here is my buy with both eyes stitched in place.
Now for a mouth. The simplest way to do this is by using a basic embroidery stitch called a back stitch.
Figure out where you want your mouth to be. Draw it on with some chalk or a light white crayon line if you want. Tie a knot on a fresh piece of embroidery floss and thread it into your needle. Now insert your needle at the very edge of the line.
 Push the needle through about .5 - 1cm, depending on how big you want your final stitches to be.
 Pull the thread through. If possible, pop the knot inside the fabric or clip the thread close.
 Now, reinsert the needle in the spot where you want the mouth to start (this is why it is called a back stitch). Push the needle back out where you want your second stitch to end.
 Gently pull your thread through. Don't tug too tight, or you'll just pucker the felt and you won't be able to see the embroidery stitch. Congratulations. You have achieved a backstitch.
 Now back stitch again, putting your needle into the fabric right next to your first stitch, and pushing it out of the fabric where you want your third stitch to be. Repeat until you have a mouth the length you want.
 If you don't like the shape of your finished mouth (it takes practice to not make a really evil looking or just really crooked mouth), cut the string off and pull the stitches out. You can do this by sliding your needle under the stitch and using it as a lever to pull the stitch out. If you sew for any length of time, you will become really good at taking stitches out.
Now, for your last stitch, you want to put the needle into the fabric close to your last stitch, like before, but push the needle through a lot of stuffing and out somewhere else on the head. Pull tight and clip the thread close to the fabric. Push the thread around with your fingers until it disappears into the fabric. This should keep the stitching in place. Congratulations, you have just done your first basic embroidery.
 You can also use backstitches to add any other details you might like. If you want to make circles, or fill things in, do a vertical backstitch (where the stitches are next to each other instead of end to end).
Now I will show you how to add felt decorations. If you are a pro stitcher, you can use a blanket stitch. There is some sort of funky trick that I have yet to figure out to make a real blanket stitch, so I will show you my cheater blanket stitch.
Cut out your felt shape, and decide where you want it to be. Thread your needle with a fresh piece of thread and tie a knot on the end.
 Put the needle into the fabric in a spot that will be underneath your felt piece. Push the needle out through the fabric and the felt piece about .5 cm in from the edge.

Pull your thread through. Push the needle into the fabric just behind the felt piece.

Push the needle so that it comes out through the fabric and the felt piece. It should be .5 cm to one side of your original stitch, and .5cm from the edge of the felt piece.
 Now, pull it gently, so it is flat but not too tight, and you have your first stitch. Repeat this until you have gone all the way around your shape.
 When you are done, make a small loop and tie a knot just underneath the felt. Clip the thread close to the knot.
 You are finished! Congratulations on completing your first sewing project!
If there are any errors in these tutorials, please leave me a comment and let me know so I can correct them. If you have any alternate ways of doing things, also let me know in the comments. AND if you make one of these little guys, please post him or her or it somewhere and leave me a link to it.
Happy stitching!
I should preface this section of the tutorial with a disclaimer: no happy bunnies were harmed in the making of this tutorial. Felt creatures enjoy having faces sewn on, no matter how gruesome the photographs might make it seem.
So, at this point you should have stitched all the way around your softie, leaving a hole that is a couple of inches big for stuffing.
 Take a handful of polyfil out of the bag:
Squish it a few times until it gets smaller, like this, and then stuff it into the hole. Stuff the extremities first: legs, ears, tails, that kind of thing. You want to stuff it firmly enough so that it is 3 dimensional, but not so firmly that it looks like it is about to burst.
 If you are finding you can not pack the stuffing in as much as you would like with your hand, use the flat end of a pen or the eraser end of a pencil. I did this for the ears:
 See, I stuffed the legs and the ears first, since they are almost impossible to get to once you start stuffing the middle. If you find you have a section where you stitched too loosely, so that even a tiny bit of stuffing is pushing the two sides apart, go back and re-stitch it with a new piece of thread.
 Once you have done the legs and ears, stuff the arms, and then the middle. You will find that the fabric stretches. This is okay, so long as it doesn't thin out so much that you start to see the stuffing through the fabric. You can see that my bunny is now taller than he was before. When it is nicely full but not overstuffed, stitch up the hole. Start about a cm. away from the beginning of the gap, and stitch 1cm over the other seam on the other side.
 You should now have a softie that looks something like this guy below. It is now time to embellish! You may do whatever you like to him. Below I will show you how to do basic embroidery (a back stitch), put on buttons, and add contrasting felt decorations. You should know that I have sort of learned all these things on my own over time, so my techniques are not professional. They do, however, get the job done.
 Thread your embroidery needle with your embroidery floss. If you want a thinner piece of thread, you can divide your floss. Cut the length you want, and then pull apart the number of strands you would like to use for the project. Because I am lazy, I usually use all 6. You might have to lick the end of the floss and flatten it with your finger to help manouver it through the needle. You could use a little bit of lip balm on the end if you are averse to giving away a creature that contains your saliva. After your needle is threaded, tie one knot of the end.
 Decide where you want to place your first button eye.
Poke your needle into and out of the fabric. Hold the button nearby, so you can make sure that your stitch will be hidden under the button.

Pull the thread through. Try to pop the knot to the inside of the fabric by tugging gently. If it doesn't work, clip the thread close to the knot (but don't cut into the knot or it will unravel). Put your needle through the hold in the button, and pull the thread through.
 Lie the button flat against your guy's face. Poke the needle through a button hole opposite to the one you just used and into the fabric below it.
 Then push the needle kind of flat and poke it back out of the fabric. Make sure all of the stitch will be covered by the button, then pull it tight. Now push the needle through the button hole you started at and pull tight. Repeat two or three times for each set of holes. This takes a bit of needle wrangling, but its the best way I know to secure a button.
 Now, poke the needle through any hole. If you want the buttons to be a bit more secured (and your mass of threads to look a bit tidier) wrap the thread around all your previous stitches once or twice. Then tie a knot the same as you did when you were ending a thread while stitching along the sides. Make sure the knot will be covered by the button as well, and clip your thread very short.
 Congratulations! You just sewed a button on. Here is my buy with both eyes stitched in place.
Now for a mouth. The simplest way to do this is by using a basic embroidery stitch called a back stitch.
Figure out where you want your mouth to be. Draw it on with some chalk or a light white crayon line if you want. Tie a knot on a fresh piece of embroidery floss and thread it into your needle. Now insert your needle at the very edge of the line.
 Push the needle through about .5 - 1cm, depending on how big you want your final stitches to be.
 Pull the thread through. If possible, pop the knot inside the fabric or clip the thread close.
 Now, reinsert the needle in the spot where you want the mouth to start (this is why it is called a back stitch). Push the needle back out where you want your second stitch to end.
 Gently pull your thread through. Don't tug too tight, or you'll just pucker the felt and you won't be able to see the embroidery stitch. Congratulations. You have achieved a backstitch.
 Now back stitch again, putting your needle into the fabric right next to your first stitch, and pushing it out of the fabric where you want your third stitch to be. Repeat until you have a mouth the length you want.
 If you don't like the shape of your finished mouth (it takes practice to not make a really evil looking or just really crooked mouth), cut the string off and pull the stitches out. You can do this by sliding your needle under the stitch and using it as a lever to pull the stitch out. If you sew for any length of time, you will become really good at taking stitches out.
Now, for your last stitch, you want to put the needle into the fabric close to your last stitch, like before, but push the needle through a lot of stuffing and out somewhere else on the head. Pull tight and clip the thread close to the fabric. Push the thread around with your fingers until it disappears into the fabric. This should keep the stitching in place. Congratulations, you have just done your first basic embroidery.
 You can also use backstitches to add any other details you might like. If you want to make circles, or fill things in, do a vertical backstitch (where the stitches are next to each other instead of end to end).
Now I will show you how to add felt decorations. If you are a pro stitcher, you can use a blanket stitch. There is some sort of funky trick that I have yet to figure out to make a real blanket stitch, so I will show you my cheater blanket stitch.
Cut out your felt shape, and decide where you want it to be. Thread your needle with a fresh piece of thread and tie a knot on the end.
 Put the needle into the fabric in a spot that will be underneath your felt piece. Push the needle out through the fabric and the felt piece about .5 cm in from the edge.
Pull your thread through. Push the needle into the fabric just behind the felt piece.

Push the needle so that it comes out through the fabric and the felt piece. It should be .5 cm to one side of your original stitch, and .5cm from the edge of the felt piece.
 Now, pull it gently, so it is flat but not too tight, and you have your first stitch. Repeat this until you have gone all the way around your shape.
 When you are done, make a small loop and tie a knot just underneath the felt. Clip the thread close to the knot.
 You are finished! Congratulations on completing your first sewing project!
If there are any errors in these tutorials, please leave me a comment and let me know so I can correct them. If you have any alternate ways of doing things, also let me know in the comments. AND if you make one of these little guys, please post him or her or it somewhere and leave me a link to it.
Happy stitching!
Subscribe to:
Posts (Atom)

