Any other novice sewers, either adults or children ages 8 or so and up, can also use this tutorial.
Materials you will need:

- Some cotton thread (you can use thick craft thread with younger children, or for a primitive effect).
- A needle (if you are using craft thread, use an embroidery needle, otherwise, use one that is comfortable for you.)
- Some cotton thread (you can use craft thread with younger children)
- Sharp scissors
- Pins (sorry, Kris, I forgot this one)
- Polyfil Stuffing (you can pick up a bag at your local fabric store)
- Embroidery needle, embroidery floss and buttons for decorating
Pencil and paper
Draw an outline of your softie on paper. You will want to make it simple and round so it is easy to follow, and easy to stuff later. For your first go at making a pattern, I would draw the shape of the softie you want to end up with first. Then add about .5 cm to the entire outline so you have some space to stitch. Keep everything wide, so you will be able to stuff it later. If you can't fit a pencil into an ear or arm hole, it will be difficult to stuff.
 Cut out your pattern. Fold your fabric in half and pin the pattern and the two layers of fabric together.
 Cut out the two layers of fabric around the pattern. You might have to cut a little bit outside the outline at this point. See how some of the ears lines are not quite like the pattern? Now that you have the general outline, go in and trim those little lumps off.
Now, cut a piece of thread. If you cut too long of a piece, your thread will be getting tangled on everything. If it is too short, you will need new thread every 5 seconds. 30 - 45 cm is a nice length. Put one end of the thread through the eye of the needle. Pull about 15 cm through so you don't keep losing your thread.

Tie a knot on the end. Form a loop in the thread, then wrap the tail of the thread through the loop.

Then pull it tight so it looks like this. Do two or three of these knots right on top of each other, so you get one nice fat knot.
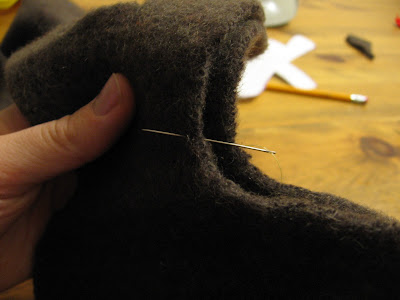
 Okay, time to start stitching. First, you want to make sure the knot ends up inside the softie, so you want to just put the needle through one layer of fabric. Pull it tight and gently tug it, so the knot is secure but doesn't slid through the fabric.
 It should look like this:
Now hold your two layers of fabric together with one hand. With the other hand, poke the needle through both layers of fabric, about .25 cm from the edge of the fabric. Let go of the needle, shift your hand to the other side of the needle, and pull it through the fabric. Congratulations, you have acieved your first stitch!

Now put the needle back in to the fabric about .25 cm from where it came out. Push it through both layers of fabric again. Pull the needle through. You now have two stitches.

The stitches should be about this far from the edge of the fabric. If you can actually see them that clearly, pull a little bit tighter, or your softie will come apart when you stuff him, or the first time little hands make him "fly".
Now you just need to keep stitching until you start to run out of thread.

When you start to run out of thread, push the needle through one layer of fabric only (the same as when we started out). Pull it through the single layer.

Make a small stitch that just catches the inside of the fabric, but not the part where you will eventually see. Do not pull this tight.

Instead, pull it until you have a nice little loop like this.
 Push your needle and thread back through the loop. I often do this backwards, because I always misjudge the amount of thread I will need to tie a knot. Kris won't have to do that, becuase she's smarter about these things than I.
 Now pull it tight, and you have achieved a knot. Cut the thread close to your knot. Cut a new length of thread and repeat the process until you have outlined almost your entire softie. When you have about 10 cm left to go, stop.
 I didn't get a chance to finish stitching my softie today, so you will all have to live in suspense until Monday or Tuesday, when I will show you how to stuff and finish your softie. Happy stitching!


2 comments:
Thank you for doing this for me Jill, and I did get pins!...but not scissors (I know what a loser I am...we only have kitchen scissors and kid scissors in the house)...please don't laugh at this question, but are you stitching up and down (as opposed to around and around the edge?) I think that's what you are doing. Don't worry, I haven't started anything yet, I'm going to get proper scissors first :o) Oh, and now I've decided to make 3 of these things, ones for my niece Sadie as well. I got some lovely blue fleece for Jeremy's (in the clearance bin) and red for Elijah (on 40% off)...I think I'll make Sadie's with the red fabric too, because you know, I bought way to much of it...but hey, if I get really good at this and get so inspired I may want to make more complicated things one day, like mittens :o) And yes, I bought the good fleece...I had no idea there were so many kinds of fleece out there.
haha. Umm yes considering pretty much all my relations live in new brunswick I'm one of the lucky few who understand how big our country really is! Love this though, cause now I could make one too! :)
Post a Comment